Custom Keyboard Layout for Arabic, Persian, and Turkish (Mac)

In 2015, when I was still using Linux, I posted my template for a custom keyboard layout that gave easy access to some of the special characters that scholars working in Arabic, Persian, and Turkish tend to require. Not long after, however, I transitioned (back) to Mac, and found myself needing to create a similar custom keyboard. After some experimentation, I’ve settled on a layout I like; here it is for you to use or modify as you like.

The Layout

This layout is called IJMESv3 (the third version of my IJMES-friendly layout), and it is based on the ABC - Extended layout that comes with MacOS. The basic layout is the same as a standard Mac keyboard, but when you hold the option key, this is what you’ll have access to:

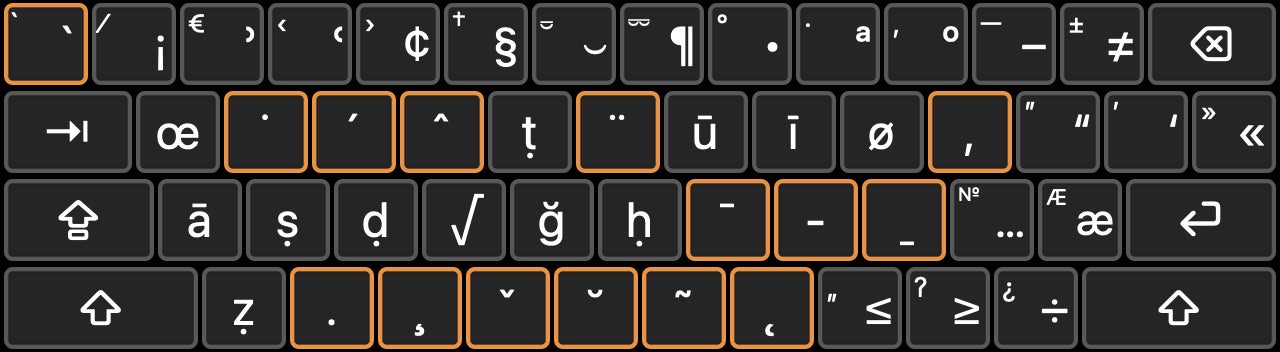
The keys outlined in orange are modifier keys, meaning that you first hit the diacritic you want, then the key to apply it to. For example, option+v is the modifier key for the caron / háček, so typing option+v, s will give you š, and so on for č, ž, etc. Similarly, option+w adds (or removes) an overdot, so you can use it to type glyphs like ż, , or ı. The other modifiers are pretty self-evident—option+e for acute (é, etc), option+y for umlaut (ü, etc.), and so on—though if you want to see some very unusual symbols, type option+shift+semicolon and let ’er rip! You can watch your options unfold in real time by clicking on the keyboard icon in the menu bar and selecting Show Keyboard Viewer (you might have to enable this in your Keyboard system preferences). Some features of particular interest for the field:

  • The common macrons Ā, Ī, and Ū are immediately available by pressing the option key (Ē and Ō can be accessed with option+j)
  • The common underdotted glyphs Ṣ, Ṭ, Ḍ, Ẓ, and Ḥ are accessed with the option key (less common glyphs, such as Ḳ, can be typed with option+x)
  • Turkish Ğ is immediately accessible as option+g
  • The signs for hamza (ʾ) and ʿayn (ʿ) are option+2 and option+3, respectively (Arabeezi style)
  • Quotation marks—double, single, and guillemet—are found at [, ], and \ respectively; hit option to open and option+shift to close
  • I have over-lines, through-lines, and under-lines mapped to option+j, option+k, and option+l respectively (note that the underlined s̱, commonly used to transliterate Persian ث, is not an actual Unicode character, so you have to type s and then the Combining Macron Below character: s, option+shift+l)
  • For those interested in metrics, you can find the characters ⏑ , ⏒ , and ⏔ on the numbers 6 and 7; use option+- for the long syllable (–)

Installation

  1. Download IJMESv3.bundle.zip and unzip it
  2. Go to the Finder, click on Go in the Menu Bar, select Go to Folder…, and type /Library/Keyboard Layouts/
  3. Drag and drop IJMESv3.bundle into that folder
  4. Logout or restart
  5. Open System Preferences… in the  menu, select Keyboard, click on Input Sources, hit +, and you should be able to find IJMESv3 among the English layouts

You’ll know you’ve got the right one if you see a bright red-and-yellow square with the Derafsh Kaviani on it (I wanted something that looked good in both Light and Dark modes).

That’s all you need to do on your end! If you’re interested in knowing more about how I made this file, or how you might modify it, read on.

Creation, Manipulation, and Other Links

I used the useful program Ukelele to create this layout. If you want to make any tweaks to this file, download Ukelele and open IJMESv3.bundle with it. There, you’ll be able to change output, terminals, modifier keys, names, icons, you name it. You can also create your own layout by selecting the input source that most closely matches your ideal, then going to Ukelele and selecting New From Current Input Source from the File menu. This will create a copy of the layout that you can fiddle with, and when you are done, drop it into your Keyboard Layouts folder as detailed above and you should be able to type with it!

Another helpful resource to consult is the website Computing in ME Languages, hosted at the University of Chicago Library. It’s a little old, but as far as I know its Alt-Latin keyboard layout still works on modern machines.

Hope this helps you all!

Using Steingass: A Tutorial

One of the most useful Persian-English dictionaries for classical and literary Persian is by Francis Joseph Steingass (Routledge, 1892), which has been converted to text and placed in a searchable database at the University of Chicago. With its rich array of meanings, idioms, and compound verbs, Steingass is a good first stop when looking up a new word. However, the search engine has a number of quirks you need to know about.

Persian script

  • If you are searching for a word with ی and it’s not coming up, try using the Arabic ي.
  • Any word that ends with ک (e.g. سنگک) must be written with the Arabic ك (e.g. سنگك).
  • Words that end with tā marbuta (ة) in Arabic must usually be written so in Persian as well (e.g. ولایة instead of ولایت).

Transliteration

  • Familiarize yourself with Steingass’s transliteration system. The short vowels are written a, i, and u (as in Arabic); the ending ـه (e.g. نامه) is written -a (nāma); diphthongs are ai, au, iy, and uy; the majhūl vowels ē and ō are preserved (e.g. شیر sher “lion”, روز roz “day”); and the preposition به / بـ is spelled ba.
  • Note that the order of headwords follows the English alphabet: when you search for گرد you will first find gard and its related verbs and idioms, followed by gird and then gurd.
  • Remember that there are many idioms in Persian, particularly with compound verbs; e.g. گل (gul) by itself is simply “rose”, but gul kardan = “To extinguish, to snuff (a candle); to become apparent, manifest”; gul firistādan, “To send a challenge, to provoke an adversary”. These are often not searchable in Persian script, but only by first pulling up the headword (گل in this case) and then looking through the idioms in transliteration.
  • More on compound verbs and idioms: you’ll usually want to work with the first part of the sequence. Searching in transliteration can help you. Say you find the phrase سر ببال دزدیدن: first go to the headword سر and then search in the browser for duzdīdan (note that Chrome does not care about diacritics, which is helpful); you fill find “sar ba-bāl duzdīdan, To refuse, to disobey, to oppose”.

PDF management using Zotero

This is a post on using Zotero as a PDF management system that I wrote up for our startup project Islamicate Digital Humanities; I figure I might as well include it here.

Zotero is one of the most robust citation management systems out there—open source, free, and great at grabbing metadata and files straight from the web—and with a little tweaking, it can become a great way to organize and maintain a large library of PDFs. For many users, the default settings are perfectly fine, but there are some potential drawbacks that some (such as myself) may wish to address:

  • Sharing PDFs between your computers may become dicey if your library becomes too big. One option is to simply pay $20/year to get 2GB of storage space on Zotero, or you can pair it up with a service like Box or Google Drive through the WebDAV protocol (see Zotero’s sync documentation; more links at the bottom of this page). However, if you opt for one of these solutions, you may be turned off by another issue:
  • By default, Zotero puts each attachment in a separate folder, buried deep within its directory system and assigned a random number. This is intentional; to protect your data, you’re not supposed to be able to easily find and manipulate your files directly. However, if you like to access your files easily through the Finder, this can be annoying.

There is one very easy way you can move your Zotero attachments to another folder where they are visible to the naked eye, so to speak, and that is the ZotFile plugin, but ZotFile, rather unavoidably, does not play well with the WebDAV solution mentioned above. It is possible, however, to set up your Zotero database using ZotFile to link all your attachments to a shared folder such as DropBox or Box. This is the route I opted for, and with a little trial and error, I found a system that is working very well for me (almost perfect, but not quite, to quote Shel Silverstein). In the following post, I will walk you through the steps I did to configure Zotero on multiple machines sharing a single library; I cannot guarantee this will work on every computer, but if your setup exactly matches what I describe below, it should work.

Prerequisites

Before diving in and making a mess of things, first check to make sure you meet the following conditions, or at least are aware of what issues you might have to address if you do not:

  1. I am using two Macs—a desktop and a laptop—and I am using the same username for both machines. This is important because it means that my directory path for attachment storage will be identical on both computers; i.e. they will both say /Users/thisismyusername/DropBox/Zotero. If your username varies from computer to computer, your path will not be the same, and this may make the following tutorial unusable for you; or at least you will have to do some additional steps to make sure your attachments are pointed towards exactly the same location.
  2. Going back to that first point, this was done and tested on Mac OS X. I am sure it will work the same for Ubuntu or other Unix-based systems, but I am not familiar enough with Windows to vouch for it. If you use Windows, make a backup (which you should do anyway) and proceed at your own risk. (There is a link at the bottom of this page that may be more helpful for you.)
  3. Set up a user account with zotero.org, if you don’t have one yet.
  4. Finally, set up an account with a service that syncs a folder with online storage: this could be DropBox, Box, or Google Drive, to name three of the most well-known options. Pick your favorite, navigate to that directory, and create a folder to store your files. (I’m calling it “Zotero” for the sake of this tutorial, but of course you can call it whatever you want.)

Step 1: Set Up Your Library

If you already have a working Zotero library, start by backing it up (if you don’t know how to do that, go to Zotero’s guide to backing up and follow the instructions). If not, just open up vanilla Zotero, hop onto J-Stor, and download a couple articles to have a working sample to try out.

Once you have your library set up and backed up, you’ll want to download the ZotFile plugin. Go to zotfile.com and follow the instructions for installation (these will vary depending on whether you prefer using Zotero Stand-Alone or the Zotero plug-in with Firefox).

Now that ZotFile is installed, time to set up your preferences! There are two sections where we will be adjusting our preferences, so make sure to hit them both. Let’s start with ZotFile: click on the settings button in Zotero, select “ZotFile preferences,” and follow the steps below:

  1. In General Settings, you want to set a Custom Location for the location of your files. I’m using Box, so I get /Users/myusername/Box Sync/Zotero. I also tick the “Use subfolder” option and fill the box with /%A/; this will sort all my files into subdirectories arranged alphabetically by last name, making it very easy for me to navigate to the ‘S’ folder to look up ‘Smith’. (Again, you can set up your subfolder schema—if you want one at all—however you like; this is just what I did.)
  2. In Tablet Settings, I did not change a thing. I’m not dealing with tablets. (But if you are, investigate this further, it’s a great feature.)
  3. In Renaming Rules, I tweaked the format to read { %a } { %y } - { %t }, and I also unchecked the “Truncate title” option. These are cosmetic; you can choose whatever naming system you like (see the ZotFile renaming rules) or stick with the defaults, which are very good.
  4. In Advanced Settings, tell Zotfile to always automatically rename new attachments (this simplifies your life). You shouldn’t have to change anything else, but I did ask ZotFile to “Remove diacritics from filename” to make searching easier, and I added the djvu suffix to the list of filetypes it will work with, since I do like the .djvu format. These changes, too, are of secondary importance.

To review, the only really important thing we have done so far is set the Custom Location for our files in a directory that syncs to the cloud, so that we can access them from other computers when the time comes. Now, on to the Regular Zotero preferences (click on the settings button and select ‘Preferences’).

  1. In General, you don’t need to change anything (but I like to uncheck automatic snapshots and tags).
  2. In Sync, enter the Username and Password for your Zotero account, and make sure “Sync automatically” and “Sync full-text” is checked. Uncheck the two options under “File Syncing” (‘Sync attachment files in My Library’ and ‘Sync attachment files in group libraries’); ZotFile is taking care of this part.
  3. The Search, Export, and Cite menus you can leave alone.
  4. In Advanced, click on the sub-category of “Files and Folders” and set your Base directory to be the same as what you set in ZotFile—in our example, it will be /Users/myusername/Box Sync/Zotero. Under “Data Directory Location”, leave it set as your profile directory. The profile directory does not contain any files you need to mess with, and can remain hidden. The one thing you must never do is put this directory in a DropBox (etc.) folder; that will corrupt your database over time. Just leave it happy where it is.

Hit OK. We have set our preferences and done most of the work. Now it’s time to test out ZotFile. Select all of the files in your library (it matters not whether it’s 10 or 1000), right-click, and select Manage Attachments --> Rename Attachments. ZotFile will do its magic and rename and relocate your entire library to the directory you have designated using the system you specified—and it can do a huge library in just a minute or two. Go to your Zotero directory just to make sure the files are there, and they should start automatically uploading into the cloud. If everything looks good, go back to the main Zotero window and hit the green sync button (in the upper right corner of the window, it looks like an arrow turning clockwise); this will upload your database (sans files) to your online account. If you want to make sure it’s there, you can hop back onto zotero.org, and you should see your database under ‘My Library’.

To recap, here’s what you’ve done so far: you’re using Zotero’s sync capability to maintain an online database of all your references and files, and meanwhile ZotFile has taken over the work of managing where those files get stored. A simple division of labor.

If everything looks good, you’re basically done: syncing new computers to this library can be done relatively quickly and easily. if you have a large library you want to make sure doesn’t get screwed up, make a copy of your profile directory and keep it somewhere as a backup. Now, open up a clean install of Zotero on your second machine, install ZotFile, and set up the Zotero and ZotFile preferences EXACTLY as they are on your primary machine. Once the preferences are set up and match perfectly (can I stress this enough?) hit the green sync button on the new install of Zotero, and a great thing will happen:

  • Zotero will grab all your database info and metadata from its server, duplicating your library into your second computer;
  • ZotFile will tell it to look for the linked files in the Dropbox/GoogleDrive/Box folder you specified.

What’s great about this system is that you can now effectively use Zotero from either machine. If you add a new article while on the road, ZotFile will move it to DropBox (etc.) to be shared with your main computer, and Zotero will update its servers; so that when you get back home and open Zotero, the PDF will be waiting for you in your DropBox and your Zotero library will have synced up to the most recent version. Even your annotations will be shared across machines, and if you want to share a file with a friend, DropBox or Box or Drive makes it easy. I’m very happy with this setup. There is only one issue you should know about that I am not sure how to address: if you delete a file in Zotero, ZotFile will not delete it from your hard drive. In other words, because of our division of labor, you have to delete the file twice, so to speak: first you delete the entry from Zotero to remove it from the database, then you have to go to your DropBox folder and delete the actual PDF (fortunately, there is no harm if you just leave it, but it clutters things up).

I hope this is helpful! Let me know if you see any potential problems or have any suggestions as to how I can improve it.

Links

Here are the major links I mention in this post, in addition to a number of tutorials that helped me out quite a lot to figure this out.

Arabic and Persian diacritics for Ubuntu keyboard

I’ll inaugurate my new site with a blast from the past. It may be useful for someone out there.

Some years ago, I started playing with Linux, specifically Ubuntu, and one thing I had to work at to get running was a good layout for Arabic and Persian transliteration. Some of the default international keyboards that come bundled with most Linux distribution carried most of the diacritics I need, but usually they were tucked away in awkward places and none of them included ayn and hamza, so I had to build my own layout. As far as I know, there are no easy GUI programs out there to create a custom layout; you just have to go in the old-fashioned way and edit the text file. Fortunately, it’s pretty simple. Each line begins with a code that defines the key; typically, this will be A (for alphanumeric), A-E (rows 1 to 5, bottom to top) 1-12 (key position in the row, going left to right). After the key is defined, you can offer up to four values, which will correspond with what the key will produce by itself, with Shift, with AltGr (usually the right Alt key), and Shift+AltGr respectively. So, for example, let us consider the following line:

key <AD07> { [ u, U, uacute, Uacute ] };

So from the code, we know that this key on the alphanumeric keyboard, fourth row from bottom, seventh from the left. If you found the letter “U”, good job. Now we see that by itself, it produces “u”, with Shift “U”, with AltGr “ú”, and with Shift+AltGr “Ú”. You can substitute these names with their Unicode equivalents; for example, the Unicode ID for “Ú” is U00DA, so you could erase “Uacute” and replace it with “U00DA” and get the same character. I did this when inserting my characters, simply because I didn’t know all their names and you can be absolutely precise when picking your character.

Installation: In Ubuntu, and I assume most Debian-based flavors of Linux (if not more), the keyboard layout files are located in /usr/share/X11/xkb/symbols. If you don’t find it there, look it up for your system and it should be fairly easy to locate. Now the first thing to do is decide which keyboard you want to modify. I chose the US “alternative international” keyboard, since ‘alternative’ is a good word to describe what we’re doing. First thing’s first, you’ll want to backup your keyboard, so in case you run into any problems, you can restore the original without any hassle. All this will have to be done through the terminal using the sudo command. Here are the steps you’ll go through:

  1. Open a terminal
  2. Type cd /usr/share/X11/xkb/symbols (or the appropriate directory)
  3. Type sudo cp us us_backup (this makes your backup)
  4. Type sudo gedit us (or choose your favorite text editor)
  5. Once the document is opened, search for “Alternative International” group (it was the third one down, for me)
  6. Highlight the text from partial alphanumeric_keys down to };
  7. Delete the text and copy the layout below in its place
  8. Save the document, quit, and log out
  9. When you log back in, go to the “Keyboard Layout” preference, hit the + button, and add English (US, alternative international) to your list of layouts
  10. If you run into problems, you can always sudo rm us and then restore the original by typing sudo cp us_backup us

Here is the code to copy over:

partial alphanumeric_keys
xkb_symbols "alt-intl" {

name[Group1]= "English (US, alternative international)";

include "us"

key <TLDE> { [ grave, asciitilde, dead_grave, dead_tilde ] };
key <AE01> { [ 1, exclam, exclamdown, questiondown ] };
key <AE02> { [ 2, at, U02BE ] };
key <AE03> { [ 3, numbersign, U02BF ] };
key <AE04> { [ 4, dollar, sterling, EuroSign ] };
key <AE05> { [ 5, percent, onehalf, onequarter ] };
key <AE06> { [ 6, asciicircum, U00A7, dead_circumflex ] };
key <AE07> { [ 7, ampersand, U00B6, dead_hook ] };
key <AE08> { [ 8, asterisk, U2022, U00B0 ] };
key <AE09> { [ 9, parenleft, dead_breve ] };
key <AE10> { [ 0, parenright, dead_abovering ] };
key <AE11> { [ minus, underscore, U2013, U2014 ] };
key <AE12> { [ equal, plus, multiply, U00F7 ] };

key <AD01> { [ q, Q, dead_belowdot ] };
key <AD02> { [ w, W, U02B7, U1D5B ] };
key <AD03> { [ e, E, U0113, U0112 ] };
key <AD04> { [ r, R, dead_acute, dead_grave ] };
key <AD05> { [ t, T, U1E6D, U1E6C ] };
key <AD06> { [ y, Y, U1E6F, U1E6E ] };
key <AD07> { [ u, U, U016B, U016A ] };
key <AD08> { [ i, I, U012B, U012A ] };
key <AD09> { [ o, O, U014D, U014C ] };
key <AD10> { [ p, P, leftsinglequotemark, rightsinglequotemark ] };
key <AD11> { [ bracketleft, braceleft, leftdoublequotemark, guillemotleft ] };
key <AD12> { [ bracketright, braceright, rightdoublequotemark, guillemotright ] };
key <BKSL> { [ backslash, bar, notsign, brokenbar ] };

key <AC01> { [ a, A, U0101, U0100 ] };
key <AC02> { [ s, S, U1E63, U1E62 ] };
key <AC03> { [ d, D, U1E0D, U1E0C ] };
key <AC04> { [ f, F, U1E0F, U1E0E ] };
key <AC05> { [ g, G, U0121, U0120 ] };
key <AC06> { [ h, H, U1E25, U1E24 ] };
key <AC08> { [ k, K, U1E35, U1E34 ] };
key <AC09> { [ l, L, U1E2B, U1E2A ] };
key <AC10> { [ semicolon, colon, dead_diaeresis ] };
key <AC11> { [ apostrophe, quotedbl, dead_acute ] };

key <AB01> { [ z, Z, U1E93, U1E92 ] };
key <AB02> { [ x, X, U1E95, U1E94 ] };
key <AB03> { [ c, C, U010D, U010C ] };
key <AB04> { [ v, V, U0161, U0160 ] };
key <AB06> { [ n, N, U23D1, U23D2 ] };
key <AB07> { [ m, M, U2014, U23D4 ] };
key <AB08> { [ comma, less, dead_cedilla, dead_circumflex ] };
key <AB09> { [ period, greater, dead_abovedot, dead_caron ] };
key <AB10> { [ slash, question, U0331, U0304 ] };

include "level3(ralt_switch)"
};

// Keyboard layout by Cameron Cross for Arabists and Persianists.
// Dead characters (use AltGr):
// ~ = grave and tilde / 3 = macron / 6 = circumflex / 7 = hook / 9 = breve / 0 = abovering
// ; = diaresis / ' = accent / , = cedilla / . = dot above / ? = combining macrons below and above
// q = dot below / r = grave and acute / < = circumflex / > = caron
// Special characters (activated with AltGr):
// All vowels have macrons; s t d and z all come with dots below
// 1 = ¡ ¿ / 4 = currencies / 5 = percentages / - = en/em dash / = math characters
// 2 and 3 = ʾ and ʿ (Arabeezi style)
// y = ṯ / f = ḏ / x = ẕ / g = ġ / c = č / v = š /
// k and l = ḵ and ḫ (two alternatives for transliterating "kh")
// w = ʷ and ᵛ (for Persian خو)
// p [ ] = quotes (‘’«»“”)
// n and m = metrical signs ⏑ ⏒ —⏔

As you can see from the comments section, this keyboard is very specifically tailored to my needs. I borrowed elements I like from the US International, UK, and Macintosh layouts, plus some of my own ideas. I write a lot about poetry, so I designated “n” and “m” for metrical units. I also prefer to avoid digraphs in my transliteration, so I have all these special characters for “th”, “kh”, “sh”, “ch”, and “gh” around the center of the keyboard (see comments). The Arabeezi system of 2 for ق (which is often pronounced as hamza, hence ʾ) and 3 for ع is pretty intuitive for me, so I kept that, and I love the Mac’s handling of – for en and em dashes—which I use all the time—so those are there. I will point out that this keyboard is not ideal for Turkish, although you can use AltGr+9+g for ğ and AltGr+.+i for your dotless ı. On the other hand, once the layout is successfully installed, you can go back and tweak the file with your own Unicode characters as you like. Save your changes in a separate text file, so that if you ever upgrade your system, you can just copy and paste it into the document like you did before. Piece o’ cake.

For more information, check out the following sites. I especially liked the one by the fellow medievalist who works on Anglo-Saxon literature.