
Interleaved NMR experiments are often used to collect relaxation dispersion, zz-exchange, CPMG relaxation and T1/T2/NOE relaxation etc. This is often done to minimize the effect of degradation of sample, precipitation and aggregation over time on individual experiments. These aforementioned experiments can be done as a bunch of 2D experiments queued one after another, but the intensities of a spectra of slightly unstable protein could vary over time causing addition artifacts.
Approach
Design a working version of the 2D experiment
First we need a 2D version of the experiment one wants to run where we create a segment in the pulse sequence that is varied between the different experiments. In the case of relaxation dispersion experiment this variable is referring to the number of CPMG pulses that are applied over a small mixing time of ~40ms and in the case of zz-exchange experiment, this variable refers to the time in milliseconds that is used to mix between two states under equilibrium. Let us try to use a complex case where the loop counter is varied where a counter is used to determine the number of times a segment is repeated.
We first need to pass the value of –DCPMG via ZGOPTNS if we want to activate CPMG sections of the pulse sequence which can be done using “# ifdef CPMG” command as described below.
# ifdef CPMG5 d26 ; tau_cp(p61*2 ph3):N15 ;CPMG specific sectiond26 ; tau_cplo to 5 times l2# endif
This will iterate the three lines of the code “l2” number of times which is also supplied by user via Topspin. Now testing this pulse sequence is all that is left to confirm the correct implementation of the delays and pulses. Once this is conformed we would proceed to the following step where we collect thse experiments as a pseudo-3D experiment.
Pseudo-3D experiment
In an interleaved experiment, the first scan is done for first loop counter value, subsequent scans for the following loop counters and at the end of loop it should start from the first value all over again until the number of scans are exhausted. We would later split these individual experiments and combine with corresponding loop counter using a Topspin macro (discussed in another post).
We will base this experiment on the 2D experiment where “l2” is used as a loop counter to vary the number of times a certain section of the code is run. The F1 and F2 dimension of the 2D experiment is going to be converted to F1 and F3 in our pseudo-3D experiment and F2 dimension will be used in the “QF” mode to vary the number of points in the loop counter. This has certain advantages over using F1 dimension as a loop counter as the chemical shift variable names, their corresponding increments and MC loop names have to be changed throughout the pulse sequence. With the use of F2 for loop counter eliminates this issue and one can keep the exact same variable names as their 2D versions for chemical shift labelling and MC loop names.
#include <Delay.incl>define list<loopcounter> ncyc_cp = <$VCLIST>"l2=0"
We plan to use non-standard variable names such as “COUNTER” that is defined in “Delay.incl” which is added in the early section of the code. The second line is added where the pulse program reads the list of loop counter that is defined in Topspin in the “VCLIST” section and is stored in “ncyc_cp”. In the third line we plan to use l2 for incrementing through “ncyc_cp” where the default value is 0 (first in the list).
"l5=ncyc_cp[l2]""COUNTER=(trunc(l5+ 0.3))"
After the initial few lines (which starts with “ze”) of the pulse sequence these two lines are added. “l5” is a temporary variable that is used to store the “l2th” value and incremented by 0.3 and truncated to get the value before decimal. This is stored in “COUNTER” which has the equivalent status as “l2” from the 2D experiment and the actual loop counter value.
if "COUNTER != 0"{5 d26 ; tau_cp(p61*2 ph3):N15 ;CPMG specific sectiond26 ; tau_cplo to 5 times COUNTER}else{;Reference spectrum}
Just like the 2D experiment, we use a loop to iterate “COUNTER” number of times. We can use if statements to check for “COUNTER” value and if it is “0”, we can use a certain code for reference spectrum and certain section of the code to run CPMG section. This eliminates the need for “# ifdef CPMG” to be given by user.
d11 mc #0 to 2F2QF(calclc(l2, +1))F1EA(………)
Now the only thing left is the incrementing “l2” values as QF in the aqusiton section of the pulse program. We will add “F2QF(calclc(l2, +1))” in between MC loop and the F1EA lines where for each scan we increment “l2”. Ignore the error one will get if spdisp is used as this is a known problem with Topspin 3+.
Setting up the Pseudo-3D in Topspin 3+
Click on the 6th icon from the left in your successful 2D experiment

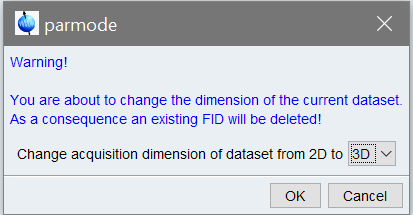
Choose 2D->3D
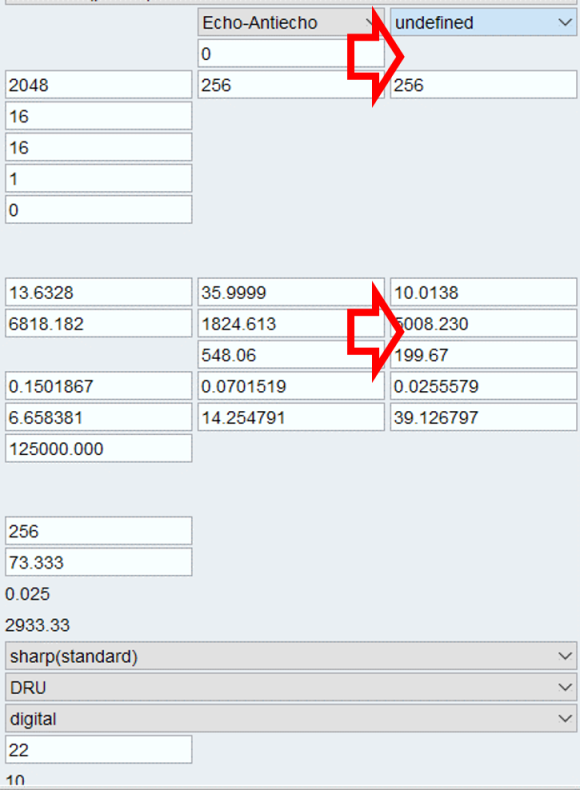
Copy over the acquisition parameter from F2 dimension to F1 dimension. Because now F3 is equivalent to F2 and F1 is equivalent to F1 dimensions from your 2D experiment. We will use the F2 dimension for incrementing our loop counter.
Change the “FnMODE” for F2 dimension to “QF” and TD2 to the correct number of loop counters one wants to use. In our case we have 16 loop counter values hence TD2 is 16. Make sure the NBL value is set to 1.
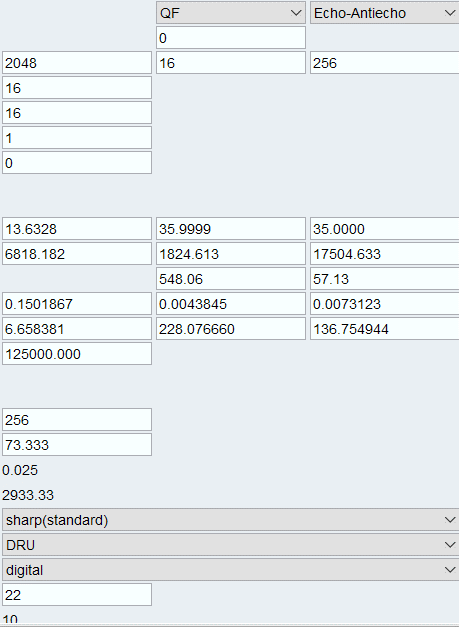
Create a new loop counter file or read an existing file using the VCLIST section of the aqpars in Topspin3+. Any value that is 0 can be used that acts as a reference spectrum and non-zero values act as loop counter values.
Processing Pseudo-3D Data
Once the experiment is done running enter “xfb” and select “13” with correct loop-counter value to obtain the 2D version. There is a way to split these experiments into corresponding 2D experiments automatically using Topspin macros which will be discussed later.